![]()
The Daily Activity screen shows the activity of a vehicle in within a 24 hour period (midnight to midnight) in the timezone of your organization. The report defaults to the current day, however previous days can be selected. Go to the Activity link > Vehicle tab, and click a vehicle name in the list. If the vehicle has current activity, the Daily Activity link is displayed below the map.
| NOTE: |
Traffic information on any map in MyEROAD reflects the current traffic flow. When going back in time, e.g. when viewing the Daily Activity Report for a previous date, traffic flow information (if displayed) for the current day and does not reflect traffic status of the selected time. |

Downloading or Scheduling the Report
![]() Click the Tools menu, located at the upper right of the MyEROAD page to download or setup to receive this report on a regular schedule.
Click the Tools menu, located at the upper right of the MyEROAD page to download or setup to receive this report on a regular schedule.
To download:
Click the Tools menu and select Export CSV.
To schedule:
1. Click the Tools menu and select Schedule this Report.
2. In the Schedule Report menu, enter a descriptive name or use the default.
3. Select a Delivery Frequency option.
4. In Active, select an option for how long you want to receive the report.
5. Click Add to begin regular report delivery.
Accessing the report
The Daily Activity Report can be accessed from:
- VTR screen by clicking

- Activity screen by selecting a vehicle and clicking in the Activity pane
- Reports tab by clicking on Daily Activity Report
Viewing the report
To select a vehicle:
- Start typing the vehicle name in the vehicle box on top.
Relevant vehicle names will be displayed in the drop down. - Select the vehicle.
To choose the reporting period:
- Select a day by clicking

 or by using the date picker.
To filter the report and show selected event types only:
- Click on
 .
.
Event types available will show in the drop down. - Tick event types to show in the report.
Your vehicle set up determines the event types that are available.
|
Event type |
Event details |
|
Ignition |
|
|
Geofence |
|
|
Driver |
|
|
Ehubo Audits |
Ehubo has entered an unauthorised state
|
|
Idle / Info |
|
|
Input |
For Seatbelts this will show "Seatbelt ON" and "Seatbelt OFF" events
|
Summary information
Daily Activity is summarised at the top of the report including:
- total distance
- number of Site Visits
- total Running Time and Stop Time
- If your vehicle has auxiliary inputs connected, the total time and distance travelling while the input was engaged will also be reported.
Viewing details
View the Event Log for a much more detailed record of vehicle events.
To view the Event Log:
- Click in the Tools dropdown in the top right hand corner of the screen.
- Select Go to Event Log.
The Event Log screen will be launched.
Viewing exempt miles
The Daily Activity screen allows you to view details of any exempt miles claimed ("off-road") and includes beginning and ending Ehubo readings, start and end location, latitude and longitudinal coordinates, and total exempt distance per exempt portion.
To highlight off-road portions on the Map in a separate color:
- Open the Map Options by clicking
 on the right upper corner of the Map.
 - Select Off-Road.
Detailed information will be displayed in the Map bubble.
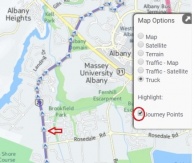
Showing or hiding journey points
From the upper right corner of a Daily Activity map, click the downward arrow to open the Map options. Click the checkbox to show Journey Points or remove to hide.
Viewing off-road journey details
You can use the off-road tools to quickly and easily find and view off-road journeys for a particular day.
- Click the link next to the off-road distance
 to see the off-road journey details screen. This link is only available if off-road journeys have been completed during that day.
 - Selecting the off-road journeys link will result in a list of all the off-road journeys for that day being displayed on the left side of the screen.
- Click the
 link in the off-road distance field to return to the Daily Activity screen.
NOTE:
- The off-road journey is highlighted in green between the start and end indicators
- The "Total" distance for each off-road journey is the distance measured between the start and end indicators of the off-road travel
Viewing shared vehicles
Vehicles that are shared with Activity History can be viewed in your Daily Activity Report for the time period they are shared with you.
This helps you to verify fulfilment of service agreements and charge out jobs correctly and applies to both vehicles currently shared with you now and vehicles that have been shared with you in the past.
NOTE: The Daily Activity Report for shared vehicles does not include information on Geofences and Site Visits. Event Log is not available. **US only** Configurations cannot be changed. **US only**
Changing trip configurations
To change a configuration:
- Choose an event.
- Click in the 'Config.' Column of the chosen event and the 'Change Trip Configuration' window will appear.
- Choose your configuration from the Configuration drop down list (if you select STP you also need to enter the Permit details).
- Select Finish Point:
- Select 'Onwards' if you want the system to automatically apply the chosen configuration from the selected event onwards.
- Select 'Select the finish point' to choose that last event in that configuration.
Note:
Configurations can be changed both in real time and retrospectively. If your vehicles are traveling in the same configuration for an entire reporting period, you only need to set the configuration once. However, if a vehicle's configuration changes, you should change the configuration so that the correct tax rate is used for calculating taxes due.
Exporting the report
To export the report in either PDF or CSV format:
- Click in the Tools dropdown
 in the top right hand corner of the screen.
 - Select Export PDF or Export CSV.